Selenium Tutorial Java and JUnit article will help you to learn Selenium Webdriver and its all features. I will explain the Selenium Webdriver step by step for beginners. After this article, you will create your first Selenium Testing project without any pain. Also, you can answer basic Selenium Interview Questions in test automation interviews. Let’s start to Learn Selenium Webdriver Java and JUnit.
Table Of Contents
Selenium Tutorial Java and JUnit Audience
This selenium tutorial is designed for beginners who have little or no automation experience. At the end of this selenium webdriver tutorial, you will have a web automation environment and you will write your first Selenium automation script.
Selenium Testing Prerequisites
Web Automation Framework: Selenium Webdriver
Development Kit: JAVA JDK
Web Browser: Chrome
Java Test Runner: JUnit
IDE: IntelliJ (I prefer IntelliJ) also you can go with Eclipse
Build System: Maven
Environment Editor (Optional): Rapid Environment Editor (RapidEE)
Nice to have: Before starting this tutorial, it is nice to have basic knowledge of JAVA or any other object-oriented programming languages.
Selenium Automation with Step-By-Step Instructions
Step-1: Installing Chrome
Link: Download Chrome
You can download the latest version of the Chrome web browser above link. When you downloaded the setup file, you can easily install it by pressing “Next” buttons.
Step-2: Installing Ranorex Selocity
Firebug and Firepath died! We can use Chrome and Ranorex Selocity plugin instead of them. You can find all the details for Ranorex Selocity in this article: Ranorex Selocity Article.
Step-3: Installing Environment Editor
With RapidEE you can easily edit Windows Environment Variables. To get RapidEE, go to Download RapidEE and download a suitable version with respect to your windows operating system and install it by pressing “Next” buttons. When your installation finished, you will see the below screenshot.

Step-4: Installing JAVA JDK
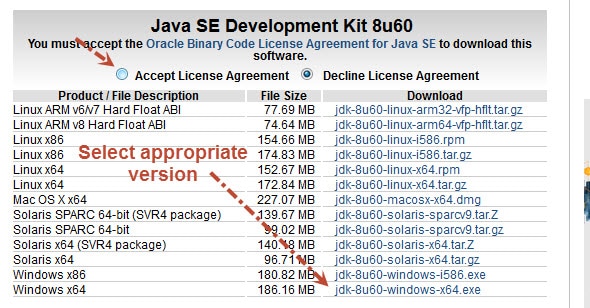
Go to Java JDK Download Page and select the appropriate version of JDK and click “Accept License Agreement” and download JAVA JDK as shown below.
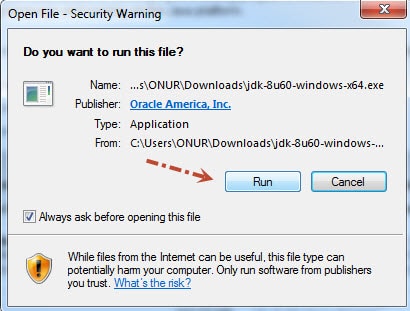
• After downloading JAVA JDK, you can install it by clicking “Next” buttons as shown below:


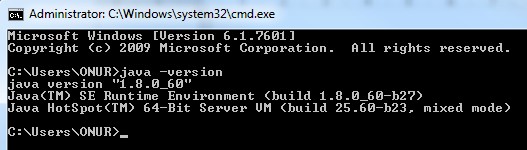
• Then we should check JAVA with command prompt by typing the following command “java –version”. This command will give us the JAVA version and this means we have successfully installed JAVA JDK.
Step-5: Installing Maven (Build Tool)
Based on the concept of the project object model (POM), Maven can manage a project’s build, reporting, and documentation from a central piece of information. It is the easiest way of installing Selenium. It can automatically download all dependencies which are written in your pom.xml file and build your project with standard project layout format. You can find all the details about maven from Maven HomePage.
To install maven first go to the download page (Download Maven) and click “binary zip archive”
Note: The latest version of maven is now 3.6.0 (23 March 2019 Update). Please do the same thing for the version 3.6.0

When you downloaded the installation file, then we should follow the instructions which are written on Maven Installation Instructions page.
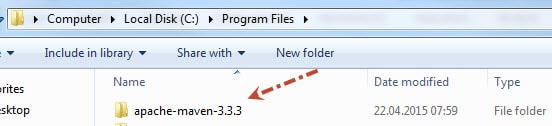
1- First, copy “apache-maven-3.6.0-bin.zip” and paste under “C:\Program Files” and then extract it. After extracting the package it will look as below.
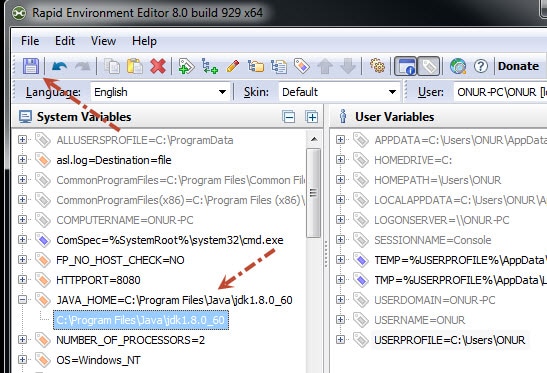
2- Set JAVA_HOME environment variable.
• Open RapidEE and click “Add new variable” button.

• Write “JAVA_HOME” as a variable name.

• Then press “F7” and select the JAVA JDK path (C:\Program Files\Java\jdk1.8.0_60) and then click “OK” button. (Your JAVA version probably will be newer. Use your JAVA version instead of 1.8.0._60)

• Finally, save the changed setting by clicking the save icon.
3- Adding maven folder (C:\Program Files\apache-maven-3.6.0\bin) into the PATH variable.
• The first select path variable

• Then click “Add value to the current variable

• Copy and paste maven bin directory and press enter. Then click the save button.

4- Check maven installation is succeeded or not.
• Open a cmd window and type “mvn –v” then press enter. You should see below result.

Step-6: Installing IDE (IntelliJ)
We will write our test automation codes by using IDE. There is two major IDE version on the market now. They are Eclipse and IntelliJ. In this tutorial, I will go with IntelliJ. If you want to familiar with Eclipse you can go on with Eclipse IDE for this selenium tutorial.
JetBrains is developing IntelliJ and you can download its community edition version for free from their website. Its download link: Download IntelliJ
When you download the setup file, you can complete the installation by clicking the next buttons. It is so easy.
Step-7: Starting to Automate with Selenium Webdriver JUnit & Maven & IntelliJ
This is the most critical step of this tutorial. The IntelliJ versions are always updating but the flow is not changing dramatically so you can follow the below steps. Maybe you will face with some newer screens but the rest of the things will be the same. If not, please ask your questions in the comment section.
At the end of this step, we will have done our first automation project. We are using Maven as our build tool so it will automatically download everything we need for web test automation. So, now let’s start to automate step-by-step.
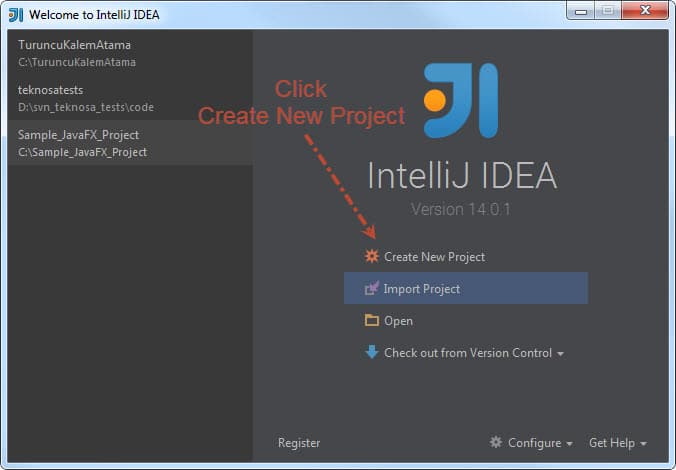
1) Open IntelliJ and click “Create a New Project”
2) Select “Maven” as the project type and then browse the JAVA folder as Project SDK and then click the “Next” button.

3) Fill GroupId and ArtifactId for maven project as you wanted. In this selenium tutorial, I preferred to write “firstSeleniumTest”.

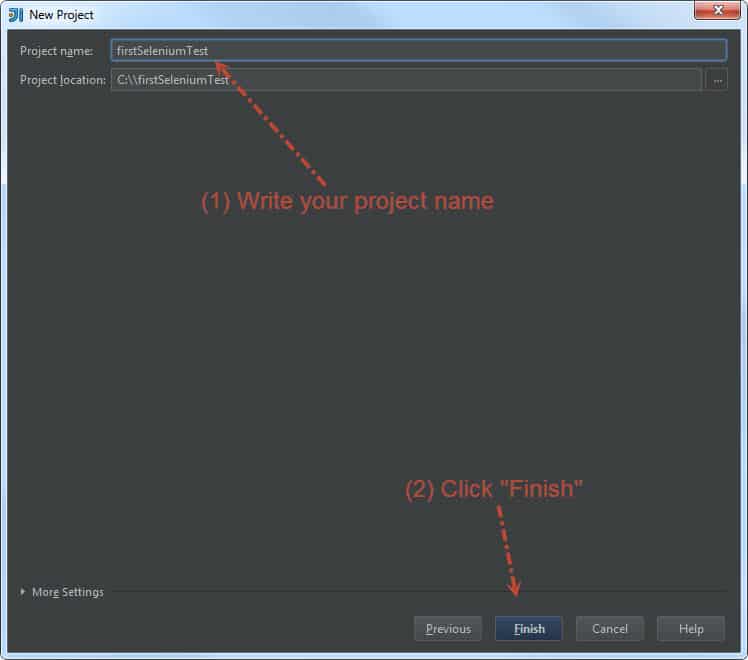
4) Give a name to your project and then click “Finish” button. I selected “firstSeleniumTest” as my project name.
5) After clicking “Finish” button, our project will be created and you will see below screen. Then, you should click “Enable Auto-Import”. Thus, when you change your pom.xml maven automatically imports the required files according to your changes.
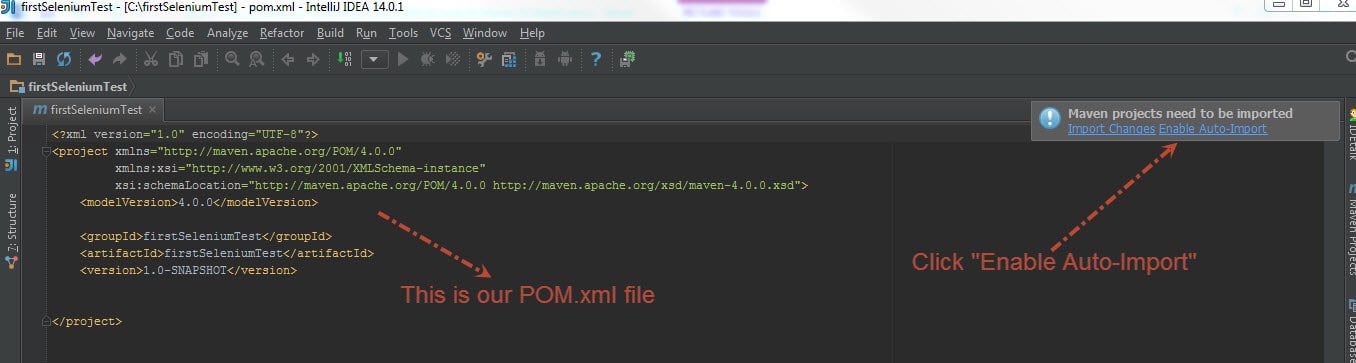
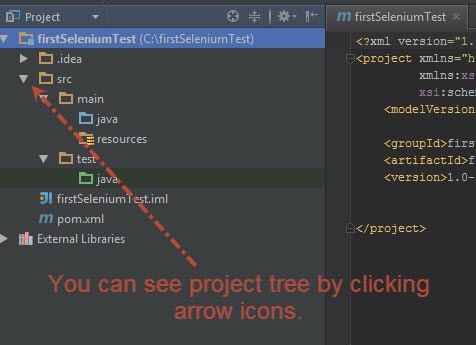
6) You can see the project tree by clicking the arrow icons. In pom.xml we hold all of our maven information. Under the test -> java we will create our first selenium test automation file.
7) It’s time to get JUnit to automate our first Selenium test. Hence, you should go here: https://mvnrepository.com/artifact/org.junit.jupiter/junit-jupiter-api and copy Maven dependency code snippet.

8) Go to pom.xml file and create <dependencies> </dependencies> section and paste JUnit dependency into it. Before we clicked “Enable Auto-Import” so after pasting JUnit dependency, IntelliJ automatically imports related JUnit files into our project.

9) Now, we will get Selenium Webdriver. It will be our test automation framework. For this, you should go to Selenium Home Page, copy maven dependency and paste into our pom.xml’s dependencies section.

• After pasting Selenium dependency, IntelliJ automatically starts to download related files. The sample pom.xml is shown below.
Please update the versions if you see the newer ones. I updated this article on 23 March 2019 and I used the latest versions of this date.
<?xml version="1.0" encoding="UTF-8"?>
<project xmlns="http://maven.apache.org/POM/4.0.0"
         xmlns:xsi="http://www.w3.org/2001/XMLSchema-instance"
         xsi:schemaLocation="http://maven.apache.org/POM/4.0.0 http://maven.apache.org/xsd/maven-4.0.0.xsd">
    <modelVersion>4.0.0</modelVersion>

    <groupId>firstSeleniumTest</groupId>
    <artifactId>firstSeleniumTest</artifactId>
    <version>1.0-SNAPSHOT</version>

    <dependencies>
        <dependency>
            <groupId>org.junit.jupiter</groupId>
            <artifactId>junit-jupiter-api</artifactId>
            <version>5.4.0</version>
            <scope>test</scope>
        </dependency>
        <dependency>
            <groupId>org.seleniumhq.selenium</groupId>
            <artifactId>selenium-java</artifactId>
            <version>3.141.59</version>
        </dependency>
    </dependencies>

</project>
Finally, we finished preparing everything. Let’s start automation!
Note: You can check how to use Selenium 3.0 in this article.
Note: For Mac, you can just copy and paste the related driver under the project directory as shown below.

10) Go to project tree, right click on java folder, then go to New, and then click “Java Class”

11) After that give a name to your first automation test and then click “OK”.

12) If you want to organize your test files, you can put them into a package. To do this, Right click to java folder, click “Package”.
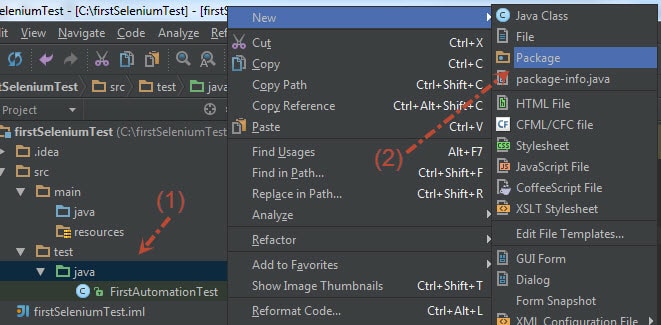
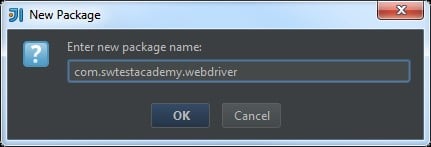
• Then give a name to a package and click “OK”.
• Drag&Drop FirstAutomation test file to our package.

• After that, our automation test file is located newly created package as shown below.

13) Now we will start to write test automation code for this selenium tutorial. I tried to emphasize important information with comments in the below code.
package com.swtestacademy.webdriver;

import org.junit.jupiter.api.Test;
import org.openqa.selenium.WebDriver;
import org.openqa.selenium.chrome.ChromeDriver;

import static org.junit.jupiter.api.Assertions.assertEquals;

public class FirstAutomationTest {
    //We should add @Test annotation that JUnit will run below method
    @Test
    //Start to write our test method.
    public void swTestAcademyTitleTest() {

        //Step 1- Driver Instantiation: Instantiate driver object as ChromeDriver
        WebDriver driver = new ChromeDriver();

        //Step 2- Navigation: Open a website
        driver.navigate().to("https:/");

        //Step 3- Assertion: Check its title is correct
        //assertEquals method Parameters: Expected Value, Actual Value, Assertion Message
        assertEquals("Software Test Academy", driver.getTitle(), "Title check failed!");

        //Step 4- Close Driver
        driver.close();

        //Step 5- Quit Driver
        driver.quit();
    }
}
14) It is time to run the code! :) To do this you can click the run icon on the upper menu or right click test automation file and then click Run ‘FirstAutomationTest’ or you can just press ctrl+shift+F10

• If the test passed you will see this on the output screen as shown below.

• When the test is failed, the output screen will look like below. You will get detailed error info on the output screen.

IntelliJ Tips & Tricks
When you start to write your class, IntelliJ automatically shows all the classes start with your class’s first letters.

When you select your class, IntelliJ automatically imports related source classes.

IntelliJ automatically shows all Classes when you are instantiating an object.

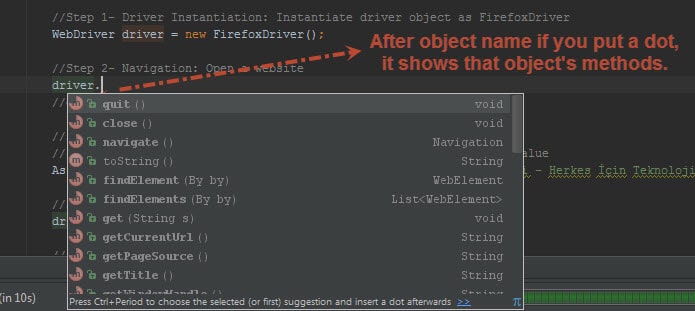
After object name, if you put a dot, it shows that object’s methods.
Summary
- Installed Ranorex Selocity and learned their usage.
- Installed JAVA JDK.
- Installed Maven.
- Set required environmental variables for JAVA JDK and Maven.
- Installed IntelliJ and learned how to create a Maven project.
- Wrote our first selenium webdriver test automation code and run it.
- Learned important key points of IntelliJ while you are coding Selenium Webdriver Java and JUnit.
Next Selenium Webdriver Article
Click Next Selenium Webdriver Tutorial: Selenium Webdriver API
Selenium Webdriver Tutorial Series
[fusion_widget_area name=”avada-custom-sidebar-seleniumwidget” title_size=”” title_color=”” background_color=”” padding_top=”” padding_right=”” padding_bottom=”” padding_left=”” hide_on_mobile=”small-visibility,medium-visibility,large-visibility” class=”” id=””][/fusion_widget_area]

Onur Baskirt is a Software Engineering Leader with international experience in world-class companies. Now, he is a Software Engineering Lead at Emirates Airlines in Dubai.
Very nice article, exactly what I needed.
can u explain the same using IE and Eclipse IDE ?
Hi, Onur Yazir will explain how to do this with Eclipse IDE soon.
Thank your very much, this is pretty straight forward.
in Step 13: If you copy and paste the code, it will not run at all. Thats why i was stuck for hours :D
Solution : type the testcase by hand and IntelliJ will automatically set the correct paths
But this article is by far the fastest and best one to setup a testing Enviroment !
Thanks for the helpful comment
Very nice article …
Perfect !
Simple and objective
What’s advantage of FirePath over FireBug?
Adamsın
FirePath is just an add-on of firebug. When you install it, you can see a new tab as “firepath” and with firepath you can find the CSS or XPATH of an element easier. Also, you can find the CSS or XPATH without using firepath. It depends on your choice and the way of locator finding. ;) “Sen de adamsın!” :)
Hello,
I have this issue when i am trying to run a script, a cannot import “org.openqa.selenium.WebDriver;”. I think it is a maven problem. Any ideeas?
Hello,
I have this issue when i am trying to run a script, a cannot import “org.openqa.selenium.WebDriver;”. I think it is a maven problem. Any ideeas? https://uploads.disquscdn.com/images/4c78885bc77d053cd1dc33f1091b4957bcd120a3066c915a3db31fb5a369be11.png
Hi Cristian,
There might be several reasons to get those errors. It is better to check below links. I hope those solutions will help.
http://stackoverflow.com/questions/6642146/maven-failed-to-read-artifact-descriptor
http://stackoverflow.com/questions/36419287/maven-failed-to-read-artifact-descriptor-for
Thank you for the answer, i tried everything and i can’t figure it out. I belive it is a maven instalation issue, but cannot figure what im doing wrong.
This was an awesome tutorial, thank you.
Thank you Julia :)
Thanks. Really helpful.
Thank you :)
Hi,
Nice great article! But at step 13 when I copy your code into Intellij I get test failed messag below. What do I wrong? Does it not work with firefox webdriver? Or must I set gekko webdriver?
java.lang.IllegalStateException: The path to the driver executable must be set by the webdriver.gecko.driver system property; for more information, see https://github.com/mozilla/geckodriver. The latest version can be downloaded from https://github.com/mozilla/geckodriver/releases
at com.google.common.base.Preconditions.checkState(Preconditions.java:738)
at org.openqa.selenium.remote.service.DriverService.findExecutable(DriverService.java:124)
at org.openqa.selenium.firefox.GeckoDriverService.access$100(GeckoDriverService.java:41)
at org.openqa.selenium.firefox.GeckoDriverService$Builder.findDefaultExecutable(GeckoDriverService.java:115)
at org.openqa.selenium.remote.service.DriverService$Builder.build(DriverService.java:330)
at org.openqa.selenium.firefox.FirefoxDriver.toExecutor(FirefoxDriver.java:207)
at org.openqa.selenium.firefox.FirefoxDriver.(FirefoxDriver.java:108)
at org.openqa.selenium.firefox.FirefoxDriver.(FirefoxDriver.java:104)
at com.swtestacademy.webdriver.FirstAutomationTest.firefoxTest(FirstAutomationTest.java:21)
at sun.reflect.NativeMethodAccessorImpl.invoke0(Native Method)
at sun.reflect.NativeMethodAccessorImpl.invoke(NativeMethodAccessorImpl.java:62)
at sun.reflect.DelegatingMethodAccessorImpl.invoke(DelegatingMethodAccessorImpl.java:43)
at java.lang.reflect.Method.invoke(Method.java:498)
at org.junit.runners.model.FrameworkMethod$1.runReflectiveCall(FrameworkMethod.java:50)
at org.junit.internal.runners.model.ReflectiveCallable.run(ReflectiveCallable.java:12)
at org.junit.runners.model.FrameworkMethod.invokeExplosively(FrameworkMethod.java:47)
at org.junit.internal.runners.statements.InvokeMethod.evaluate(InvokeMethod.java:17)
at org.junit.runners.ParentRunner.runLeaf(ParentRunner.java:325)
at org.junit.runners.BlockJUnit4ClassRunner.runChild(BlockJUnit4ClassRunner.java:78)
at org.junit.runners.BlockJUnit4ClassRunner.runChild(BlockJUnit4ClassRunner.java:57)
at org.junit.runners.ParentRunner$3.run(ParentRunner.java:290)
at org.junit.runners.ParentRunner$1.schedule(ParentRunner.java:71)
at org.junit.runners.ParentRunner.runChildren(ParentRunner.java:288)
at org.junit.runners.ParentRunner.access$000(ParentRunner.java:58)
at org.junit.runners.ParentRunner$2.evaluate(ParentRunner.java:268)
at org.junit.runners.ParentRunner.run(ParentRunner.java:363)
at org.junit.runner.JUnitCore.run(JUnitCore.java:137)
at com.intellij.junit4.JUnit4IdeaTestRunner.startRunnerWithArgs(JUnit4IdeaTestRunner.java:68)
at com.intellij.rt.execution.junit.IdeaTestRunner$Repeater.startRunnerWithArgs(IdeaTestRunner.java:51)
at com.intellij.rt.execution.junit.JUnitStarter.prepareStreamsAndStart(JUnitStarter.java:242)
at com.intellij.rt.execution.junit.JUnitStarter.main(JUnitStarter.java:70)
Process finished with exit code -1
You should use gecko driver afther selenium 3.x versions.
Very nice and simple explanation , I searched a whole internet but u r explanation is out of the world please do let me know if you have a full Junit project on POM and BDD scenarios
I am making a framework and will be using this technologies
We have some BDD with cucumber post in our website by Canberk Akduygu and Ozgur Kaya. Thank you. I did not use BDD in real life. ;)
Hi, Onur thanks a lot for the prompt reply actually I am looking for the whole example with
Java
Junit
POM
BDD
Maven
I saw one post here with a good POM example but unfortunately it is in C#
I will try to write POM for java but you can see a sample code here.
https://github.com/swtestacademy/JSWaiter
its simple and easy to understand
Thank you for your feedback Radhika. :)
Do we require to add:
System.setProperty(“webdriver.gecko.driver”,”path\\geckodriver.exe”);
Hi, I explained two ways to do it in this article. https:/gecko-marionette-firefox-selenium/
while running in selenium java version 2.42.1 i am observing the following error
org.openqa.selenium.WebDriverException: Failed to connect to binary FirefoxBinary(C:\Program Files\Mozilla Firefox\firefox.exe) on port 7055; process output follows:
Would you try the instructions which are written in this article, please? https:/gecko-marionette-firefox-selenium/
Hello Onur
I am new to test automation. I haven’t found Rapid Environment Editor tool for mac. Do I really need to use that tool for test automation. If it is required, is there any other tool that you can recommend for downloading?
Thank you in advance
Have a nice one
Hi Eyup,
For mac you need to define your JAVA_HOME and MAVEN in your profile file. You can see this in this article. https:/how-to-install-appium-on-mac/
I got following errors.
java.lang.IllegalStateException: The path to the driver executable must be set by the webdriver.chrome.driver system property; for more information, see https://github.com/SeleniumHQ/selenium/wiki/ChromeDriver. The latest version can be downloaded from http://chromedriver.storage.googleapis.com/index.html
at com.google.common.base.Preconditions.checkState(Preconditions.java:847)
at org.openqa.selenium.remote.service.DriverService.findExecutable(DriverService.java:134)
at org.openqa.selenium.chrome.ChromeDriverService.access$000(ChromeDriverService.java:35)
at org.openqa.selenium.chrome.ChromeDriverService$Builder.findDefaultExecutable(ChromeDriverService.java:159)
at org.openqa.selenium.remote.service.DriverService$Builder.build(DriverService.java:355)
please try to do the same which is stated in this article. https:/gecko-marionette-firefox-selenium/
If u have mac, just put the driver in the project folder.
Onur, many thanks for excellent and very detailed instruction.
I found a lot of blind spots in my head :) and answers as well.
Please explain or update a code for next strings:
//Step 1- Driver Instantiation: Instantiate driver object as FirefoxDriver
WebDriver driver = new ChromeDriver();
As I understood here is Chrome driver instance instead of FF.
Yes you are right. I will fix that part. :)