
Hi all, in this article, I will explain how to integrate Jenkins, TFS, NUnit, OpenCover, Cobertura, CatLight, JIRA, and Slack with each other. I tried to prepare this article to cover all details and I hope, it will help you for your continuous integration process.
Tool Belt
We will use below tools for separate purposes.
Jenkins – It is our CI server. Orchestration will be done with Jenkins.
NUnit – It is our test runner framework. We wrote our tests by using NUnit.
OpenCover – It is our test coverage tool and it is open-source.
ReportGenerator – It generates HTML reports by using .xml files.
OpenCoverToCoberturaConverter – It converts OpenCover results to Cobertura format. It creates more fancy and stylish reports. You need to build it and generate an executable. I generated one and you can download it here (version 2.0.4).
CatLight – It is a desktop build notifier and located at the system tray.
JIRA – It is our issue tracking and agile management tool.
Slack – It is our internal messaging application.
Jenkins CI Flow
Build Actions
- Trigger Jenkins and start to run Jenkins Job.
- Connect the TFS and pull the project into a local folder which is located in CI server. Then, build the latest release with MSBuild.
- Start to run NUnit Unit Tests and execute code coverage with OpenCover.
- Convert OpenCover results to Cobertura Coverage Results.
Post-Build Actions
- Publish Cobertura HTML Coverage Report
- Publish OpenCover HTML Report
- Publish NUnit Test Results
- Update relevant JIRA Issues
- Create JIRA Issue If the build fails.
- Send an email if the Jenkins job is not successful.
- Send build notifications to the related Slack channel.
- If everything pass, we will to a deployment to the test environment with Octopus Deploy. (This is another article topic.)
- Run automated Selenium Tests. (This is another article topic.)
Step by Step Explanation
1) Install Jenkins on server
Install latest version of Jenkins from https://jenkins.io/. We use Windows Server 2012 so I installed windows version. You can find the instructions here.
2) Install Plugins
Install below plugins for Jenkins.
- Team Foundation Server Plug-in
- MSBuild Plugin
- NUnit plugin
- HTML Publisher plugin
- Cobertura Plugin
- JIRA plugin
- Slack Notification Plugin
How to Install Jenkins Plugins?
Open Jenkins then go to “Manage Jenkins” –> “Manage Plugins”
Then, click “Available” tab and then write the desired plugin name into the search box. After that, the related plugin will appear. Select the plugin and click Install button. In these way, you can install all Jenkins Plugins.

3) Create a New Job/Item
Create a New Jenkins Job.
Create “New Item” icon and give a name to your job.
Click “Freestyle Project”
Click “OK” button.

Source Code Management
4) Integration with TFS
Do the settings for Source Code Management. In this article, I will show you to connect with TFS. If you use Git, please check this article to learn how to connect Jenkins with Git.
At Source Code Management section, please click “TFS” radio button and fill the fields as shown below picture.
I wanted to build the project at C:\JenkinsProjects folder.

Build Triggers
5) Set a Build Trigger or Trigger it Manually
Set a Build Trigger if you want or you can trigger it manually. I leave it blank for now and trigger the build manually.

Build
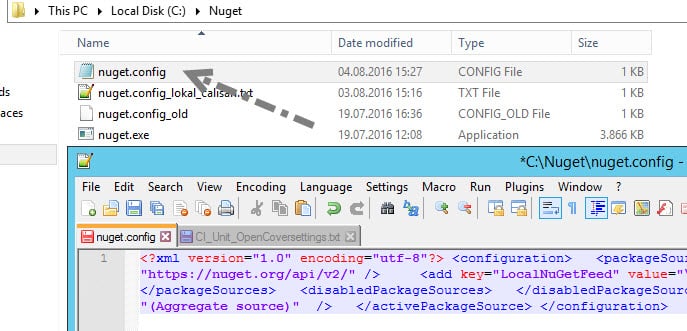
6) Nuget Configurations
If you use Nuget packages, you need to get them before build operation. First, install Nuget from here and put Nuget.exe under C:\Nuget folder.

We are using custom Nuget packages in our project thus I run a batch command as shown below.
C:\Nuget\nuget.exe restore “C:\JenkinsProjects\KariyerNet.ECommerce.sln” -ConfigFile C:\Nuget\nuget.config

In above command, I use nuget.config file and declare two keys in it. Each key represents Nuget feed. One of them is official packages and the other one is for local Nuget packages. If you do not use local Nuget packages, then you can remove the second “add key” line. I put this config file under “C:\Nuget\” folder and in it I did Nuget configurations as follows. You can modify this configuration file with respect to your project settings.
<?xml version="1.0" encoding="utf-8"?>
<configuration>
  <packageSources>
    <add key="NuGet official package source" value="https://nuget.org/api/v2/" />
    <add key="LocalNuGetFeed" value="\\yourserveradress\YourLocalNugetPackagesFolder\" />
  </packageSources>
  <disabledPackageSources>
  </disabledPackageSources>
  <activePackageSource>
    <add key="All" value="(Aggregate source)"  />
  </activePackageSource>
</configuration>
7) MSBuild Settings
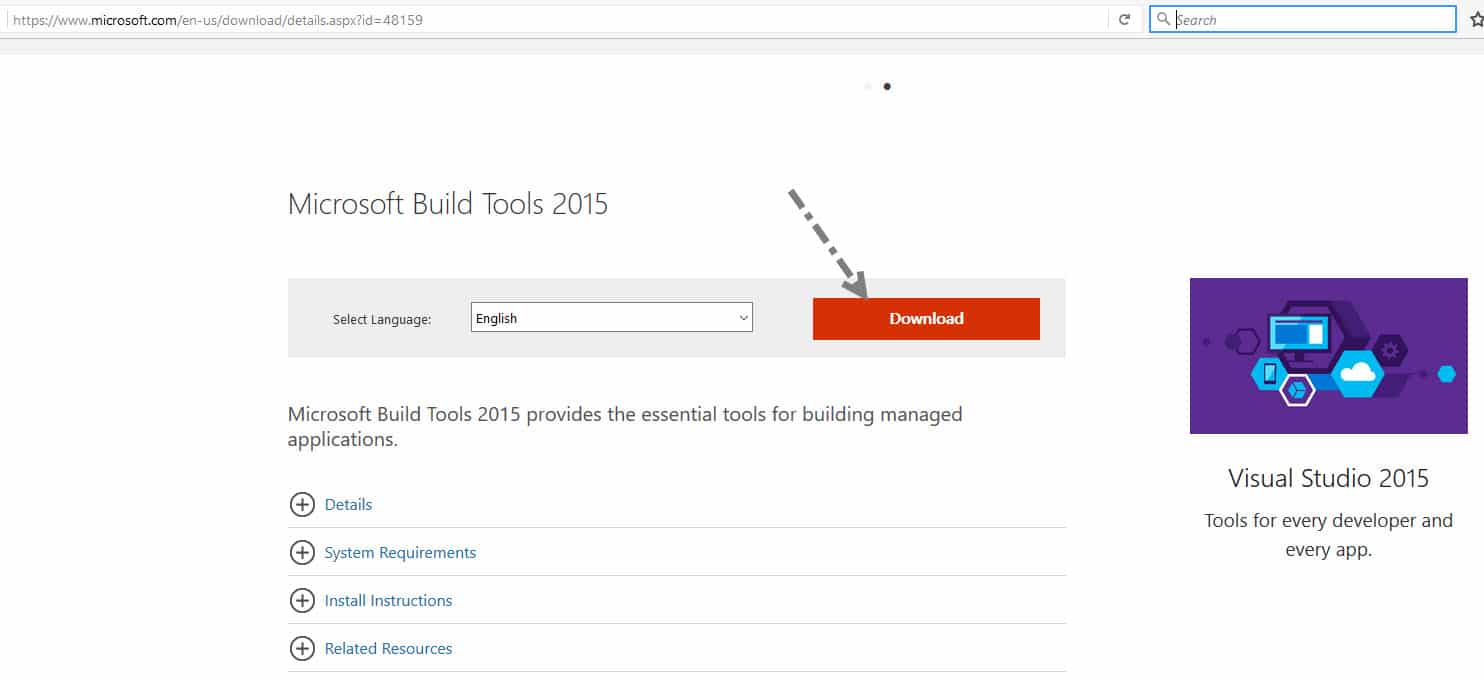
We are using Visual Studio 2015 and .NET 4.5.2 version so it is needed to install “Microsoft Build Tools 2015” from here.
After installation, go to “Manage Jenkins” –> “Global Tool Configuration” and at MSBuild section set your MSBuild path as follows.

At last step, you need to add “Build a Visual Studio Project or solution using MSBuild” step and set your solution file as “MSBuild Build File”.

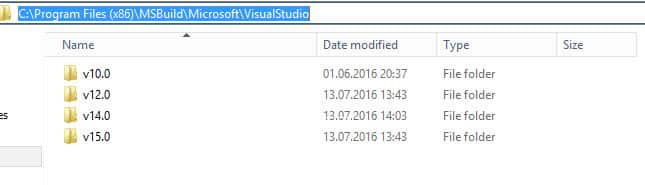
Also, copy all contents of “C:\Program Files (x86)\MSBuild\Microsoft\VisualStudio” folder from development machine and paste then into your Jenkins Server’s same path.
8) Unit Tests and Test Coverage Settings
Download and extract OpenCover under “C:\Tools” folder.

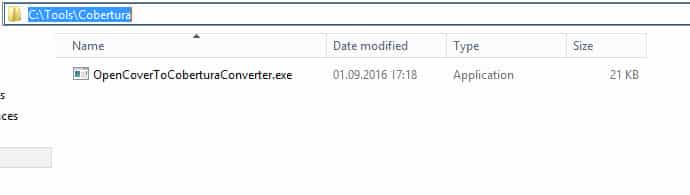
Also, generate latest OpenCovertoCoberturaConverter.exe under “C:\Tools\Cobertura\”.
I generated 0.2.4 version here.

Install latest version of NUnit.

And finally, add an “Execute Windows batch command” step and write a command as follows according to your project. For targettargs, set your Unit Test’s dll file.
Note: There is a problem to publish Nunit 3 test results with latest NUnit Jenkins plugin. Thus, I changed NUnit 3 format to NUnit 2 format by adding “format=nunit2” in below script.
Below script, automatically run all of your unit tests and create TestResults.xml file under workspace also it runs test coverage and creates Coverage.xml under workspace folder.
Script:
“C:\Tools\opencover\OpenCover.Console.exe” -register:user -target:”C:\Program Files (x86)\NUnit.org\nunit-console\nunit3-console.exe” -targetargs:”C:\JenkinsProjects\{YOUR PROJECT PATH}\bin\Debug\KariyerNet.Business.ECommerce.UnitTests.dll –result=TestResult.xml;format=nunit2″ -filter:+[fusion_builder_container hundred_percent=”yes” overflow=”visible”][fusion_builder_row][fusion_builder_column type=”1_1″ background_position=”left top” background_color=”” border_size=”” border_color=”” border_style=”solid” spacing=”yes” background_image=”” background_repeat=”no-repeat” padding=”” margin_top=”0px” margin_bottom=”0px” class=”” id=”” animation_type=”” animation_speed=”0.3″ animation_direction=”left” hide_on_mobile=”no” center_content=”no” min_height=”none”][*]* -output:Coverage.xml
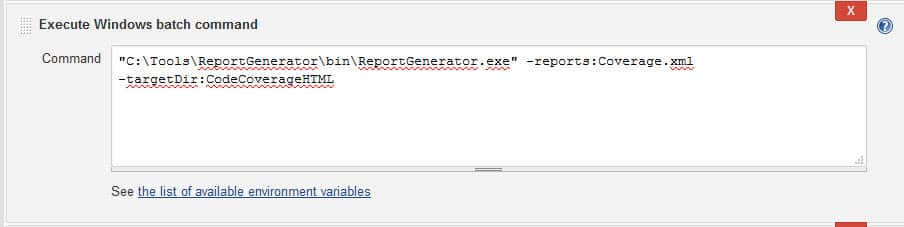
9) OpenCover HTML Report Generation
Dowload ReportGenerator and extract it under “C:\Tools” folder.

Then add an “Execute Windows batch command” and generate an HTML report by using Coverage.xml

Script:
“C:\Tools\ReportGenerator\bin\ReportGenerator.exe” -reports:Coverage.xml -targetDir:CodeCoverageHTML
10) OpenCover to Cobertura Conversion
Generate OpenCoverToCoberturaConverter.exe from here or download generated exe from here (version 0.2.4).
Put that exe under C:\Tools\Cobertura folder.
Then add an “Execute Windows batch command” and convert OpenCover Coverage.xml file to Cobertura.xml file under workspace folder.
Script:
“C:\Tools\Cobertura\OpenCoverToCoberturaConverter.exe” -input:Coverage.xml -output:Cobertura.xml -sources:%WORKSPACE%
And then, add an “Execute Windows batch command” to copy Cobertura.xml file under your local working directory path. In this example, my local working directory is “C:\JenkinsProjects\” and I want to put the Cobertura.xml under “KariyerNet.ECommerce” folder with this script.

Script:
cp “C:\Program Files (x86)\Jenkins\jobs\ECommerce\workspace\Cobertura.xml” “C:\JenkinsProjects\KariyerNet.ECommerce”

Post-build Actions
11) Publish Cobertura Coverage Report
Click “Add post-build action” button and then click “Publish Cobertura Coverage Report”

Then, write your Cobertura.xml file path as shown below.

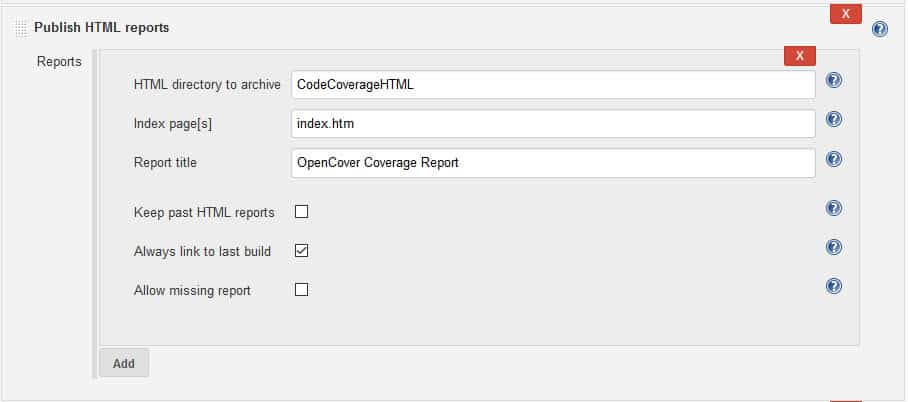
12) Publish OpenCover Coverage Report
Click “Add post-build action” button and then click “Publish HTML reports”
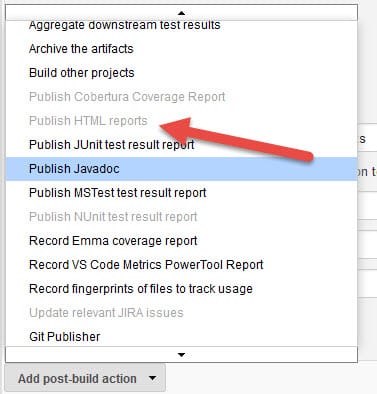
And do the below settings.
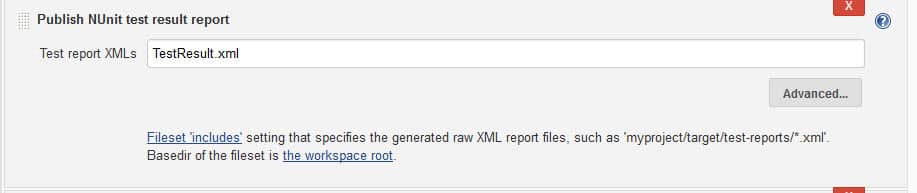
13) Publish NUnit Test Result Report
Click “Add post-build action” button and then click “Publish NUnit test result report”
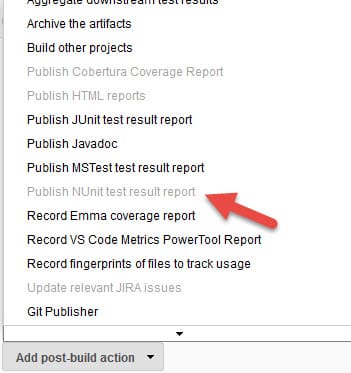
Then, do the settings below.
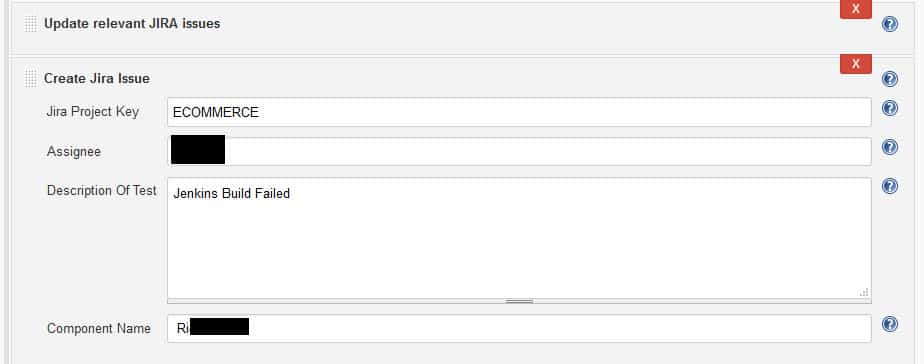
14) Update Relevant JIRA Issues and Create JIRA Issue
Before JIRA Post Build actions we should set JIRA Settings first. For this, go to “Manage Jenkins” –> “Configure System”
Then, fill Jenkins Location as follows.

Then, fill JIRA settings as follows and validate them. When you see “Success” its done.


Click “Add post-build action” button and then click “Update Relevant JIRA issues”
Click “Add post-build action” button and then click “Create JIRA issue”

After that, you can fill the JIRA post build action with your JIRA project settings.
15) JIRA Integration Settings
First, go to Jenkins and install “Jenkins Plugin for JIRA”

Then, go to Administration –> Application –> Jenkins Configuration
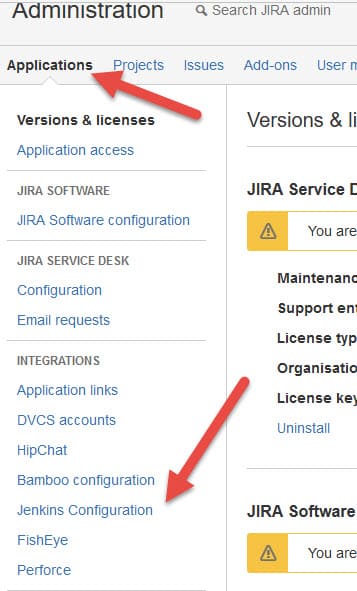
Then, add a new site with your Jenkins settings.

Select auto-enable jobs if you not selected while adding a site.

Then, you can see your jobs in Jenkins on JIRA.

16) Email Notification
First, we need to configure e-mail server settings. Go to “Manage Jenkins” –> “Configure System” and configure e-mail server settings as shown below. I did it for our e-mail server.

Then, Click “Add post-build action” button and then click “E-mail Notification”

and finally, set your email notification settings as your needs.

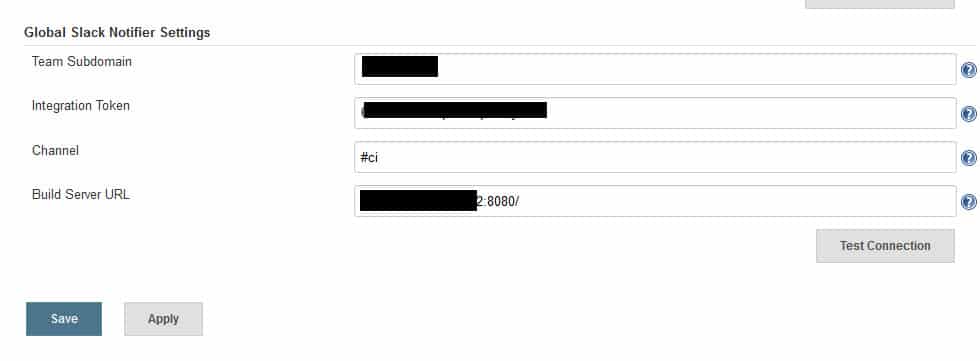
17) Slack Notifications
Login your Slack account and write Jenkins in appdirectory search bar and search “Jenkins CI” and then you need to follow the instructions for Jenkins CI & Slack integration.

After installing the Slack Notifier Plugin, click on Manage Jenkins in the left navigation, and then go to Configure System. Find the Global Slack Notifier Settings section and add the following values:
- Team Domain: “Your Team Domain”
- Integration Token: “Your Integration Token”
The other fields are optional. See the help text by clicking the question mark icon next to the fiields for more information. Press the Save button when you’re done.
And then, add “Slack Notifications” post build action and set the checkboxes with your needs.


18) CatLight Desktop Notifier
Go to https://catlight.io/, download CatLight for windows and install it.
After installation, Click “Jenkins”

After that, configure the below settings.

After that, select the related Jenkins jobs.

Then you can see the latest runs and catlight notifier.

![]()
19) Run the Jenkins Job
Before running the job, please pay attention to check the Jenkins service and look at the user information. Jenkins service should be started with the user that you logged into the server.

After all steps it’s time to run our Jenkins Job. :)
When job is running you can see the status on left pane.

While job is running you can see the logs.

While test running CatLight turns transparent.
![]()
And you can see that job is running.
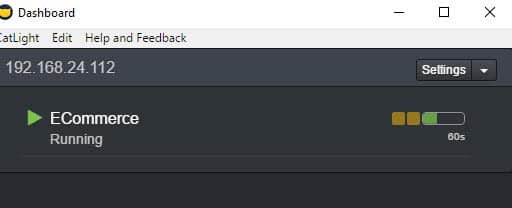
When job is finished, you can see the CatLight’s color Red/Greeen/Yellow with respect to Job Result.
![]()
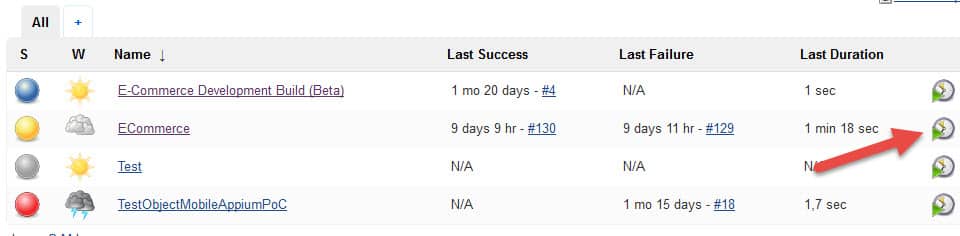
When job finished you can see the all results on Jenkins Dashboard.
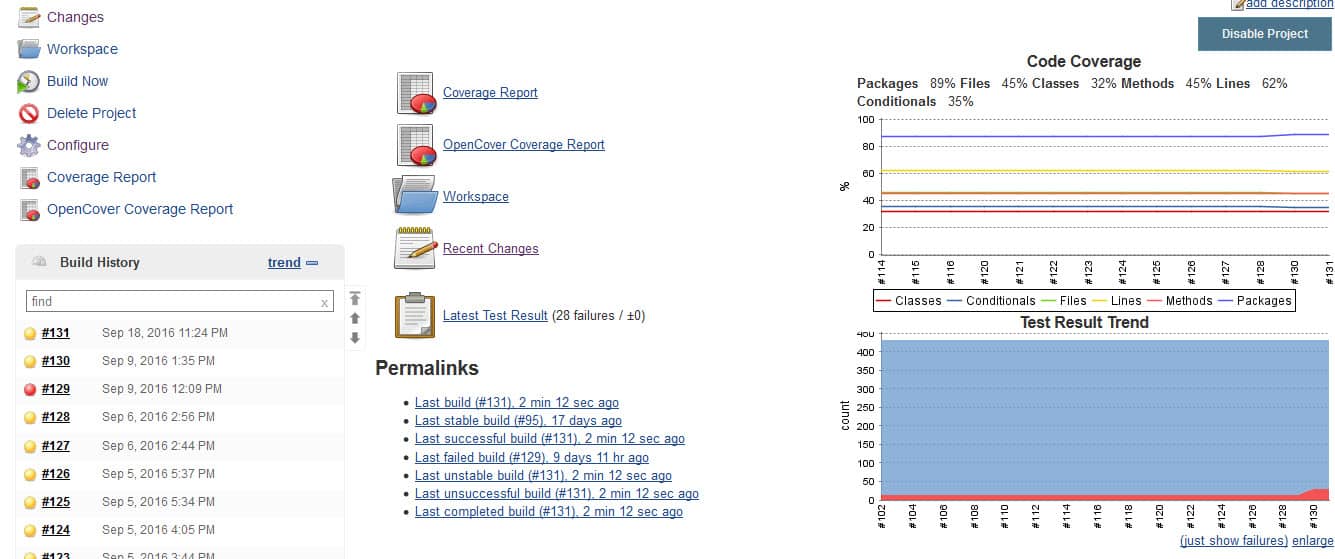
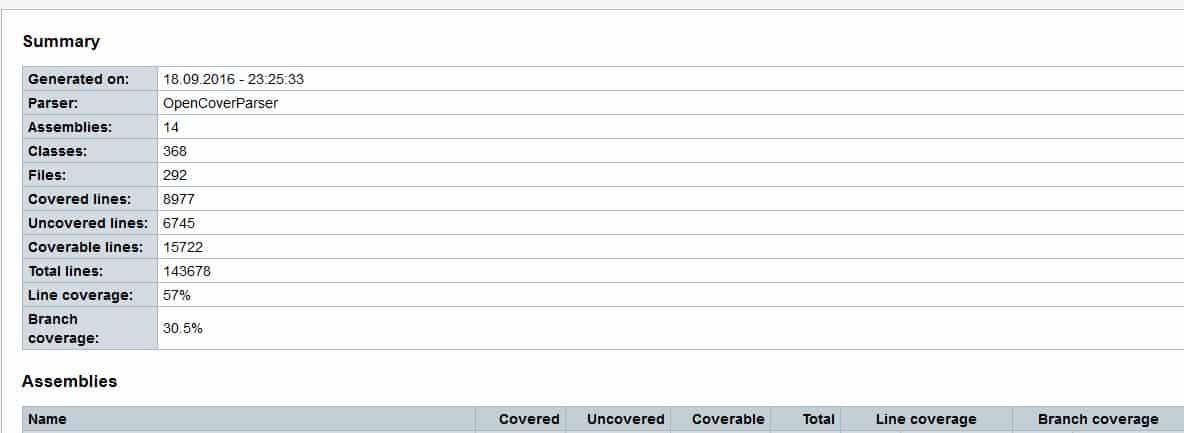
Cobertura Results

OpenCover Results
Recent Changes

Test Reults

JIRA Activity Diagram

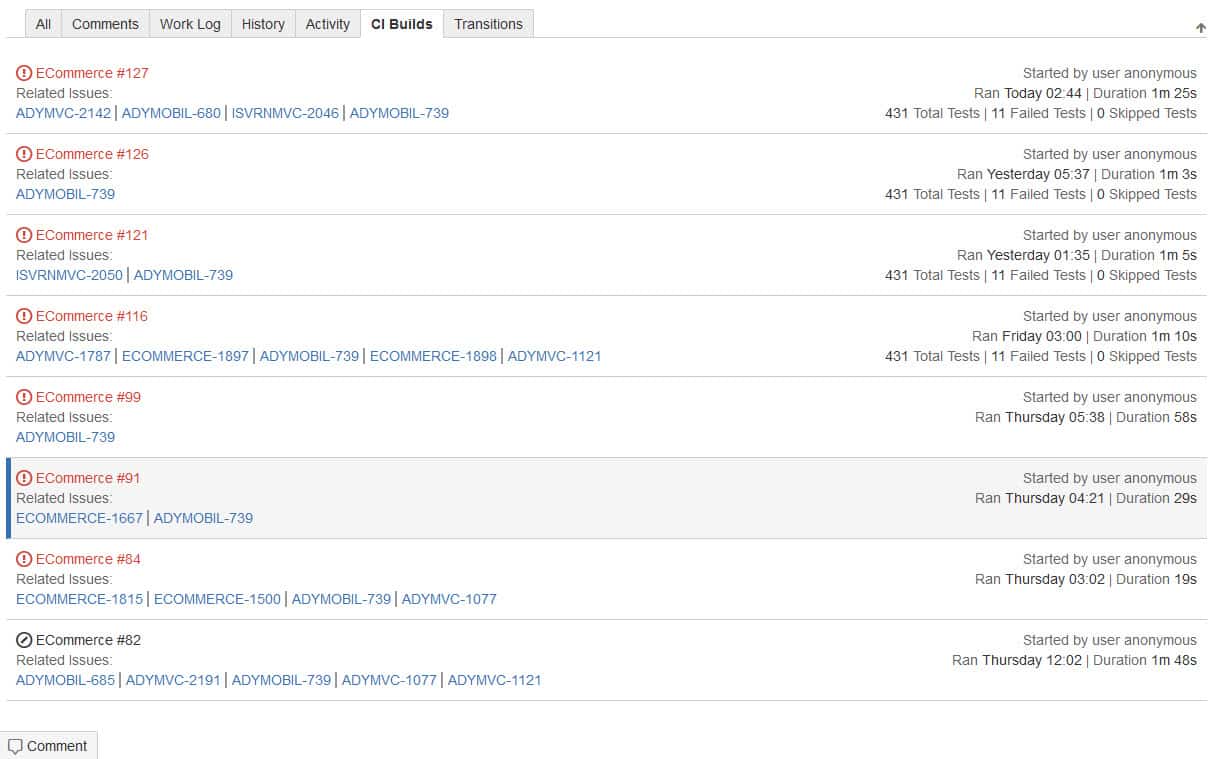
JIRA CI-Builds
JIRA Comments

Slack Notifications

Thats all for now. :)

Onur Baskirt is a Software Engineering Leader with international experience in world-class companies. Now, he is a Software Engineering Lead at Emirates Airlines in Dubai.
Another helpful article !
When you open your application file properties that has been deployed to servers, You should see version number is 1.0.0..
To fix, you should use Jenkins Change Assembly Version plugin + Version Number Plugins.
You should package the files with the same versioning number with Jira. Thanks.
Thanks for the info Ozgur. :) Version numbering is also a critical point. We will use your suggestion.
Fantastic! Well done Onur.
How about Code Deployment or Infrastructure Automation for Windows Servers? Have you done any work ?
Cheers
Frank
Thank you Frank :) For deployment, we are using Octopus Deploy. I also wrote an article on it. For infrastructure automation, we can use Chef, Ansible, and Puppet but we did not do these things yet.
which verser will be best for iis server, 3.5 or 4.5 .net server?