
In Capybara Tutorial with Cucumber post, we will learn this tool’s details with examples. I generally use Selenium Webdriver for web test automation projects. It is a great and well-known framework for this purpose. It has a very large community and supports so when you get in trouble, you can find the solutions easily.
On the other hand, some of my friends are big fans of Ruby for testing. I also attended some of Ruby Testing Seminars and saw its features and capabilities. In my opinion, Ruby has a very clean coding syntax and it is easy to learn. It does not require too much effort in automation with its libraries such as Capybara for driving web applications, RestClient for interacting with web services, SitePrism for POM (Page Object Model).
In this post, I will explain how to do installation and setup for Ruby, Capybara, and Cucumber. It is a quick start tutorial for Ruby Testing beginners. First, let’s start with definitions.
What is Capybara?
On Capybara’s official page it is described as follows: “Capybara is a library written in the Ruby programming language which makes it easy to simulate how a user interacts with your application. Capybara can talk with many different drivers who execute your tests through the same clean and simple interface. You can seamlessly choose between Selenium, Webkit, or pure Ruby drivers. Capybara automatically waits for your content to appear on the page, you never have to issue any manual periods of sleep.”
A Sample Capybara Feature:
When /^I login with "(.*?)" username and "(.*?)" password$/ do |user, password|
    fill_in 'username', :with =>; user
    fill_in 'password', :with =>; password
    click_button 'Login'
end
What is Cucumber?
Cucumber is a framework for writing and executing high-level descriptions of your software’s functionality. It supports Behavior Driven Development (BDD). It offers a way to write tests that anybody can understand, regardless of their technical knowledge. The language that Cucumber understands is called Gherkin. Cucumber itself is written in Ruby, but it can be used to “test” code written in Ruby or other languages, including but not limited to Java, C#, and Python.
An example Gherkin script:
Scenario: Filter the television list
    Given some different televisions in the TV listing page
    When I visit the TV listing page
    And I search for "Samsung" TVs
    Then I only see titles matching with Samsung TVs
    When I erase the search term
    Then I see all television brands again
Installation and Setups
Step-1: Install Ruby
For Windows the best place to install Ruby is http://rubyinstaller.org/downloads/. Go to that site and install the latest 32-bit version of Ruby, when I am writing this article latest version was Ruby 2.2.4. You can go with the latest version when you are reading this article.

Note: The 64-bit versions of Ruby are relatively new in the Windows area and not all the packages have been updated to be compatible with it.
In this post, I will go with Ruby 2.2.4 version when you read this article, you can use the latest version and I selected the below options during installation. Make sure you check the option to “Add Ruby executables to your PATH.”

Check Ruby installation with ruby -v command. You will see the Ruby version as shown below.

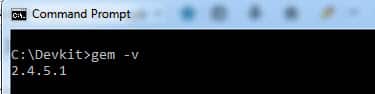
Check RubyGems installation by running gem -v on a command line. RubyGems is the package manager for Ruby and should come with the standard Ruby installation.
Step-2: Install Ruby Development Kit
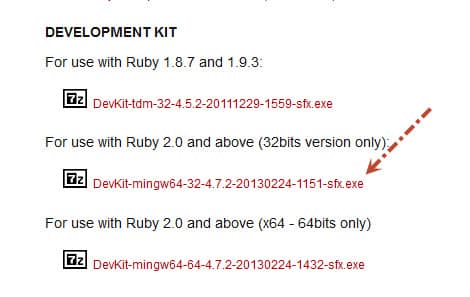
Download Ruby Development Kit on the same page. It will allow Ruby to build native extensions for libraries. In 2021, ruby and devkit bundled and you can install them together. :-)

Or you can continue the standalone installation. By clicking the archives link on the installation page.
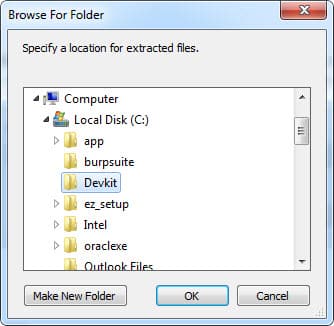
Extract it into C:/DevKit folder.
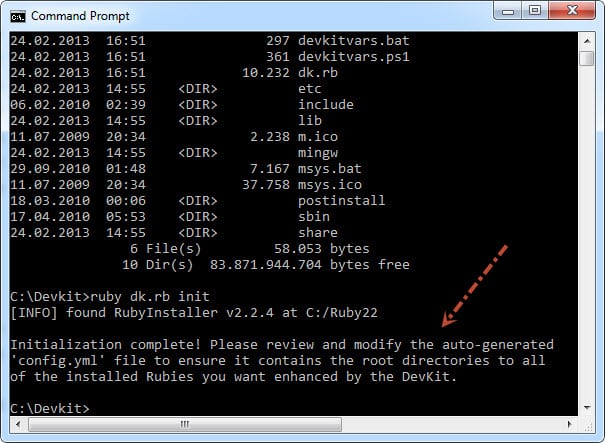
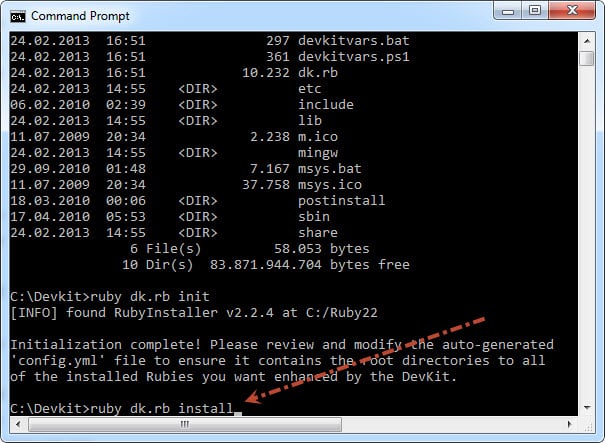
Open a command prompt and go to C:/DevKit folder and run ruby dk.rb init command to generate config.yml file to be used later.

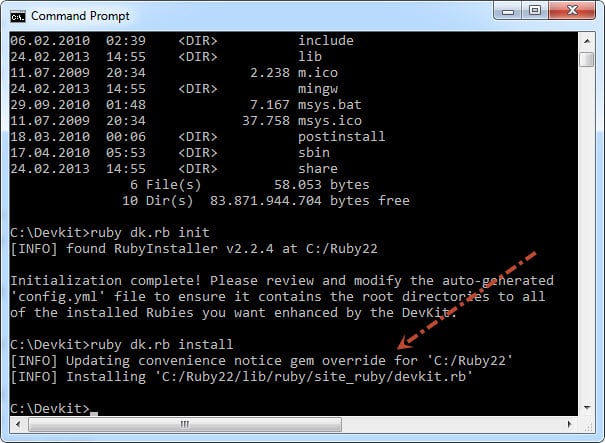
Run ruby dk.rb install This step installs (or updates) an operating_system.rb file into the relevant directory needed to implement a RubyGems pre_install hook and a devkit.rb helper library file into <RUBY_INSTALL_DIR>\lib\ruby\site_ruby.
In order to test your installation, run the below command.
gem install json –platform=ruby
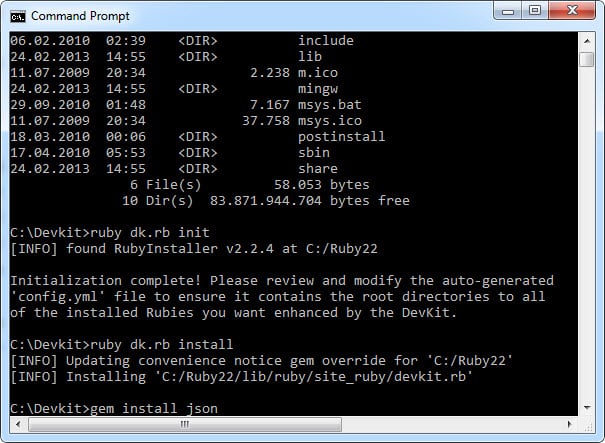
If JSON is installed correctly, you should see the below screen.


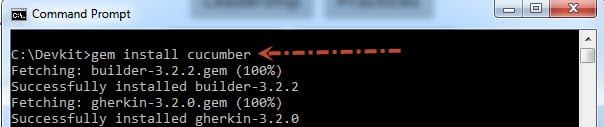
Step-3: Install Cucumber
Run gem install cucumber command to download and install Cucumber automatically. After installation, run cucumber –help command to confirm that installation is successful.

Step-4: Install Capybara
Run gem install capybara to download and install the Capybara web automation library.

Step-5: Install Selenium Webdriver
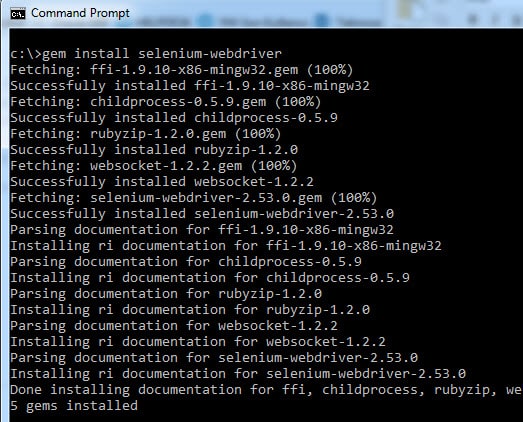
Run gem install selenium-webdriver to download and install the Selenium web automation framework.
Step-6: Install RSpec
Run gem install rspec to download and install RSpec. It is an extensive library for assertions. (By the way, there is a very nice tutorial at codeschool.com, its name is “Testing with RSpec”. I suggest you check that course.)

Step-7: Install Ansicon (Optional)
If you want to colorize the command prompt when running cucumber features, you need to install ANSICON because Windows does not understand ANSI color escape sequences.
- In order to download the latest release of ANSICON, go to https://github.com/adoxa/ansicon/downloads.
- Create C:\Ansicon directory and Unzip the download file into it.
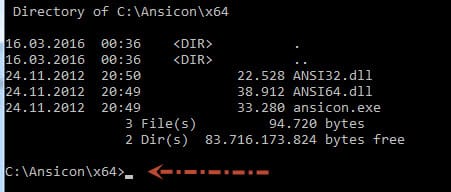
- Open a command prompt and navigate to C:\Ansicon folder.
- Navigate to X64 folder if your machine is 64bit otherwise go to X86 folder.
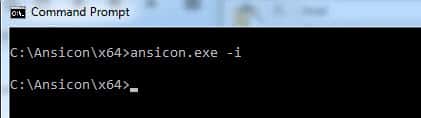
- Execute “ansicon.exe -i” to install and add ANSICON to your Windows.
Automation with Ruby & Capybara & Cucumber
First, we need to create a feature directory. We add all feature files into this folder.
Feature files should be written with Gherkin Syntax (Given-When-Then). Gherkin, a domain-specific language (DSL) that “lets you describe the software’s behavior without detailing how that behavior is implemented.”
Each scenario can have up to three parts: Given, When, and Then:
- Given – Given lines describe what pre-condition should exist.
- When – When lines describe the actions you take.
- Then – Then lines describe the result.
There are also And lines, which do whatever the line above them does. For example:
Given I am on the product page
And I am logged in
Then I should see "Welcome!"
And I should see "Personal Details"
In this case, the first And line act as a Given line, and the second one acts as a Then line.
Go into the features folder and create test.feature file. Our test scenario is:
- Go to www.google.co.uk
- Search yahoo
- See the yahoo in search results
- Click the yahoo link
- Wait 10 seconds
Now, open test.features file with notepad++ or another text editor and write the above test scenario as Gherkin syntax.
Feature: Find the Yahoo Website
Scenario: Search a website in google
 Given I am on the Google homepage
 When I will search for "yahoo"
 Then I should see "yahoo"
 Then I will click the yahoo link
 Then I will wait for 10 seconds
It is better to use fewer Given-When-Then statements in order not to create Given-When-Then Hell. In the above code, three Then statements are not a good Gherkin standard. You can try to merge them single Then statement. The last two Then statements are normally not necessary, I have added them for demonstration purposes.
Given: You can use this for data preparation and test prerequisite operations.
When: This is the action. You can do the actions with the When keyword.
Then: Then is generally using for verifications and assertions.
The below pattern is a good Gherkin Pattern.
Feature: Find the Yahoo Website Scenario: Search a website in google
  Given I am on the Google homepage
  When I will search for "yahoo"
  Then I should see "yahoo"
After writing the feature file try to run the test with the below command.
cucumber features\test.feature
We haven’t defined the test steps yet. Thus, we will get the below result after test execution.

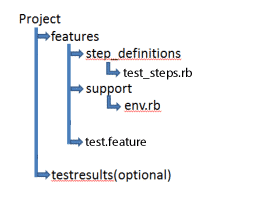
In order to prepare the step definition file, first, create a folder as step_definitions in the features folder and then create test_steps.rb file. The directory structure should be like that:
You can copy the code snippets of the test result and paste them into test_steps.rb file. Now, we can write the test steps. I want to show you how to do it, step by step.
Step-1: First, we need to navigate to google.co.uk website. Capybara provides visit method for this function. In Selenium, we can do this with driver.get() or driver.navigate().to() methods. So, we should add the below line to go google.co.uk.
visit 'http://www.google.co.uk'
Step-2: After the above operation, we are on google.co.uk page, now it is time to write the search text into the search bar. As shown below figure, the search bar’s id is “lst-ib”.

Capybara provides us fill_in method for text entrance operations. We can do this operation with the below line. In Selenium, we can do this with textElement.sendKeys(String) method.
fill_in 'lst-ib', :with => searchText
Step-3: Then, we need to check expected search results on the current page. To do this we can use the page.should have_content method. In Selenium, we can do this with JUnit, TestNG, or Hamcrest assertions. For example, assertThat(element.getText(), containsString(“yahoo”));
page.should have_content(expectedText)
Step-4: Then, it is time to click the yahoo link. As shown below figure link text is “yahoo”.
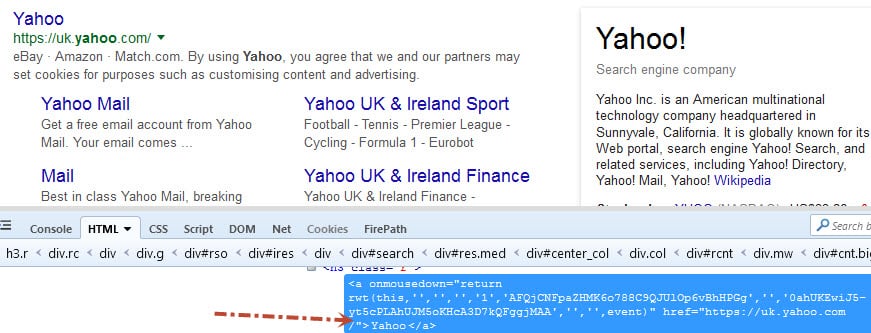
In Capybara, we can use click_link method to do this. In Selenium, we can do this with driver.findElement(By.linkText(“Yahoo”));
click_link('Yahoo')Step-5: At the last step, we will wait for 10 seconds statically to see the yahoo website. To do this, we can use sleep(10) method. In Selenium, we use Thread.sleep(10000);
Now, it is time to put them together. Our test_steps.rb code is shown below.
#Navigate to google.co.uk
Given(/^I am on the Google homepage$/) do
	visit 'https://www.google.co.uk/'
end

#Write "yahoo" search text to the search bar
When(/^I will search for "([^"]*)"$/) do |searchText|
	fill_in 'lst-ib', :with => searchText
end

#In the current page, we should see "yahoo" text
Then(/^I should see "([^"]*)"$/) do |expectedText|
    page.should have_content(expectedText)
end

#Click the yahoo link
Then(/^I will click the yahoo link$/) do
    click_link('Yahoo')
end

#Wait 10 seconds statically to see yahoo website
Then(/^I will wait for (\d+) seconds$/) do |waitTime|
	sleep (waitTime.to_i)
end
After writing step definitions, create a support folder into the features folder and create a env.rb file for environmental setups. Then, just copy and paste below environmental setup into that file and save it. I got this setup from reference-3.
require 'rubygems'
require 'capybara'
require 'capybara/dsl'
require 'rspec'

Capybara.run_server = false
#Set default driver as Selenium
Capybara.default_driver = :selenium
#Set default selector as css
Capybara.default_selector = :css

#Syncronization related settings
module Helpers
  def without_resynchronize
    page.driver.options[:resynchronize] = false
    yield
    page.driver.options[:resynchronize] = true
  end
end
World(Capybara::DSL, Helpers)
And Finally, we are ready to run our feature file. First, go to your project directory. It contains a features folder as shown below.
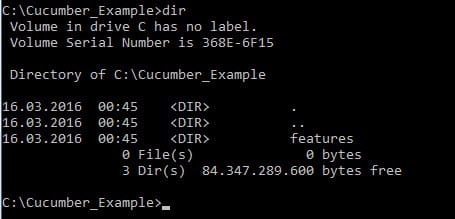
Then, run the below command.
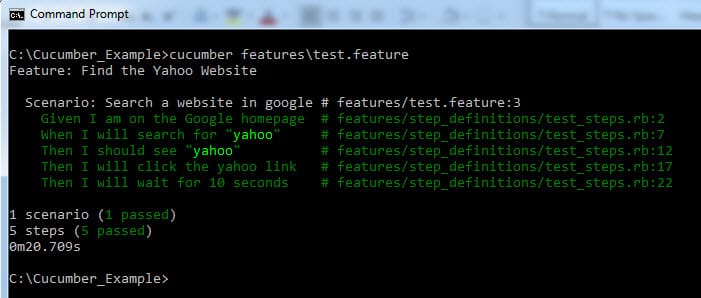
cucumber features\test.feature

And, enjoy watching the test execution :)
Conclusion
In this article, I wanted to describe the first steps of test automation with Ruby, Cucumber, and Capybara. I hope that you were also successful with these instructions. This article is just the beginning of this topic. You should do more research on references and official pages to improve your test automation skills and knowledge of Ruby, Cucumber, and Capybara. If you want to ask more questions, please do not hesitate to write your comments in the comments section. Thanks for reading my article. Happy testing! :)
References
http://agileforall.com/getting-started-with-ruby-cucumber-and-capybara-on-windows/
http://www.gamesparks.com/blog/automated-testing-with-cucumber-and-capybara/
http://shashikantjagtap.net/cucumber-capybara-poltergeist-rockstar-bdd-combo/
https://www.gridlastic.com/capybara-cucumber-code-example.html
https://semaphoreci.com/community/tutorials/introduction-to-writing-acceptance-tests-with-cucumber
https://girliemangalo.wordpress.com/2012/10/29/automated-testing-with-cucumber-capybara/

Onur Baskirt is a Software Engineering Leader with international experience in world-class companies. Now, he is a Software Engineering Lead at Emirates Airlines in Dubai.
Nicely compiled, solved my problem. All ingredients to start learning software testing is collected at one place.
Thank you made my testing life so easy!
Thank you! :)
So so!
Cool articles! Keep writing, please)
Hi,
When I start execute the test.feature file I’m getting this error:
Unable to find Mozilla geckodriver. Please download the server from https://github.com/mozilla/geckodriver/releases and place it somewhere on your PATH.
I have downloaded the file from the link and add to the environment variable path, but is still showing the same error. I must have not done it correctly could you please advise?
Thanks
From Selenium 3.X releases you need to declare marionette driver explicitly. There is a solution at below adress. Please check and try the suggested solution. http://stackoverflow.com/questions/37757040/configure-capybara-to-use-marionette-webdriver-for-firefox
If it is not worked, you can revert Selenium 3.X to 2.53.1 version.
It is very nice article.
Thank you @Sudha
We tried on several Windows10 with ruby2.2.6p396 (x64 and x86), and we received the next error:
“Given I am on the Google homepage # c:/users/……./steps_definitions/steps_definitions/test_steps.rb:2
Incompatible encoding regexp match (Windows-1252 regexp with UTF-8 string) (Encoding: CompatibilityError)”
Failing Scenarios:
cucumber features/test.feature: 2 #Scenario: Search a website in google
1 scenario (1 failed)
1 step (1 failed)
But works on Linux.
I suposed that ruby 2.X is now UTF-8 encoded by default.
What should we do?
We should add “#encoding: UTF-8” top of the all rb files. You can check code examples in this https:/automated-security-testing-using-zap/ article. I hope it helps.
Hi!
When I run test.feature I got the following error:
C:/Automate2/features/support/env.rb:24:in `’
C:/Ruby24-x64/lib/ruby/gems/2.4.0/gems/cucumber-2.4.0/lib/cucumber/rb_support/rb_language.rb:96:in `load’
C:/Ruby24-x64/lib/ruby/gems/2.4.0/gems/cucumber-2.4.0/lib/cucumber/rb_support/rb_language.rb:96:in `load_code_file’
C:/Ruby24-x64/lib/ruby/gems/2.4.0/gems/cucumber-2.4.0/lib/cucumber/runtime/support_code.rb:142:in `load_file’
C:/Ruby24-x64/lib/ruby/gems/2.4.0/gems/cucumber-2.4.0/lib/cucumber/runtime/support_code.rb:84:in `block in load_files!’
C:/Ruby24-x64/lib/ruby/gems/2.4.0/gems/cucumber-2.4.0/lib/cucumber/runtime/support_code.rb:83:in `each’
C:/Ruby24-x64/lib/ruby/gems/2.4.0/gems/cucumber-2.4.0/lib/cucumber/runtime/support_code.rb:83:in `load_files!’
C:/Ruby24-x64/lib/ruby/gems/2.4.0/gems/cucumber-2.4.0/lib/cucumber/runtime.rb:253:in `load_step_definitions’
C:/Ruby24-x64/lib/ruby/gems/2.4.0/gems/cucumber-2.4.0/lib/cucumber/runtime.rb:61:in `run!’
C:/Ruby24-x64/lib/ruby/gems/2.4.0/gems/cucumber-2.4.0/lib/cucumber/cli/main.rb:32:in `execute!’
C:/Ruby24-x64/lib/ruby/gems/2.4.0/gems/cucumber-2.4.0/bin/cucumber:8:in `’
C:/Ruby24-x64/bin/cucumber:22:in `load’
C:/Ruby24-x64/bin/cucumber:22:in `’
I’m using:
Win10
ruby 2.4.1p111 (2017-03-22 revision 58053) [x64-mingw32]
Thanks!
I fixed it!
Congrats! :)
on the other hand, I got this error while installing json:
>gem install json
Temporarily enhancing PATH to include DevKit…
Building native extensions. This could take a while…
ERROR: Error installing json:
ERROR: Failed to build gem native extension.
C:/Ruby22-x64/bin/ruby.exe -r ./siteconf20171017-1044-n4dewd.rb extconf.rb
creating Makefile
make “DESTDIR=” clean
make “DESTDIR=”
make failed, uncaught signal 11
Gem files will remain installed in C:/Ruby22-x64/lib/ruby/gems/2.2.0/gems/json-2.1.0 for inspection.
Results logged to C:/Ruby22-x64/lib/ruby/gems/2.2.0/extensions/x64-mingw32/2.2.0/json-2.1.0/gem_make.out
oops previously comment didn’t post..
I’m trying on Win10 x64 with ruby 2.2.4 and got this error:
>cucumber features\test.feature
undefined local variable or method `without_resynchronize’ for Helpers:Module (NameError)
C:/Users/JL/Documents/testcucumber/features/support/env.rb:14:in `’
C:/Users/JL/Documents/testcucumber/features/support/env.rb:13:in `’
C:/Ruby22-x64/lib/ruby/gems/2.2.0/gems/cucumber-3.0.1/lib/cucumber/glue/registry_and_more.rb:106:in `load’
C:/Ruby22-x64/lib/ruby/gems/2.2.0/gems/cucumber-3.0.1/lib/cucumber/glue/registry_and_more.rb:106:in `load_code_file’
C:/Ruby22-x64/lib/ruby/gems/2.2.0/gems/cucumber-3.0.1/lib/cucumber/runtime/support_code.rb:147:in `load_file’
C:/Ruby22-x64/lib/ruby/gems/2.2.0/gems/cucumber-3.0.1/lib/cucumber/runtime/support_code.rb:88:in `block in load_files!’
C:/Ruby22-x64/lib/ruby/gems/2.2.0/gems/cucumber-3.0.1/lib/cucumber/runtime/support_code.rb:87:in `each’
C:/Ruby22-x64/lib/ruby/gems/2.2.0/gems/cucumber-3.0.1/lib/cucumber/runtime/support_code.rb:87:in `load_files!’
C:/Ruby22-x64/lib/ruby/gems/2.2.0/gems/cucumber-3.0.1/lib/cucumber/runtime.rb:270:in `load_step_definitions’
C:/Ruby22-x64/lib/ruby/gems/2.2.0/gems/cucumber-3.0.1/lib/cucumber/runtime.rb:67:in `run!’
C:/Ruby22-x64/lib/ruby/gems/2.2.0/gems/cucumber-3.0.1/lib/cucumber/cli/main.rb:33:in `execute!’
C:/Ruby22-x64/lib/ruby/gems/2.2.0/gems/cucumber-3.0.1/bin/cucumber:9:in `’
C:/Ruby22-x64/bin/cucumber:23:in `load’
C:/Ruby22-x64/bin/cucumber:23:in `’
this is fixed after updating some formatting..
however I don’t know how to set my webdriver properly..
I have geckodriver and chrome driver stored in the same folder, and already included the path in the Path system variable.
It says:
>cucumber features\test.feature
Feature: Find the Yahoo Website
Scenario: Search a website in google # features/test.feature:2
Given I am on the Google homepage # features/step_definitions/test_steps.rb:2
Could not find Firefox binary (os=windows). Make sure Firefox is installed or set the path manually with Selenium::WebDriver::Firefox::Binary.path= (Selenium::WebDriver::Error::WebDriverError)
./features/step_definitions/test_steps.rb:3:in `/^I am on the Google homepage$/’
features/test.feature:3:in `Given I am on the Google homepage’
When I will search for “yahoo” # features/test.feature:4
Then I should see “yahoo” # features/step_definitions/test_steps.rb:12
…
Thanks.
sorry for disturbing, I have geckodriver set and able to run the test on firefox.
I have 2 questions
1) what I need to require and set in order to let it run on chrome, and provide me options to choose which browser to run on?
2) I used to write in cucumber style for the step files,
e.g.
When “I will search for $keyword” do |keyword|
@browser.div(:class => “gstl_0 sbib_a”).exists?
@browser.div(:class => “gstl_0 sbib_a”).input(:id => “lst-ib”).set(keyword)
end
How can I be able to write in the above format? because in capybara I found hard to locate and click on an element.
Thanks
Alper Mermer is very proficient on Ruby, Cucumber and Capybara. I also asked him for help. When he replied, I will get back to you.
Hi JL,
1- To have chrome as your browser, first download the appropriate version of chromedriver for your system and have its location in your path. After that, in your env.rb file add these lines in place of firefox:
Capybara::Selenium::Driver.new(app, browser: :chrome)
2- Actually, one of Capybara’s biggest strengths is its dynamic find logic.
Here is a step in a feature file:
When I search for “something”
Here is your step definition:
When(/^I search for “([^”]*)”$/) do |keyword|
find_by_id(‘lst-ib’).set keyword
end
That’s it, happy testing :)
Thanks Alper,
1- I added these 2 lines in env.rb in order to have firefox works:
require “selenium-webdriver”
Selenium::WebDriver::Firefox::Binary.path=’C:\Users\JL\AppData\Local\Mozilla Firefox\firefox.exe’
do I need to require something in additional to Capybara::Selenium::Driver.new(app, browser: :chrome)?
and I always get chromedriver.exe has stopped working on cmd no matter what version.
may I contact you via google handout?
by the way I replaced
require “selenium-webdriver”
Selenium::WebDriver::Firefox::Binary.path=’C:\Users\JL\AppData\Local\Mozilla Firefox\firefox.exe’
with
Capybara::Selenium::Driver.new(app, browser: :chrome)
and I get:
>cucumber features\test.feature
undefined local variable or method `app’ for main:Object (NameError)
C:/Users/julian.tc.li/Documents/testcucumber/features/support/env.rb:9:in `’
Hi JL,
Here is a configuration i use to run on chrome, you shouldn’t reference anything about Firefox to run on chrome
Capybara.run_server = false
Capybara.default_driver = :selenium
Capybara.javascript_driver = :selenium
Capybara.default_selector = :css
Capybara.default_max_wait_time = 10
Capybara.ignore_hidden_elements = false
Capybara.exact = true
Capybara.app_host = ‘http://www.google.com’
Capybara.register_driver :selenium do |app|
Capybara::Selenium::Driver.new(app, :browser => :chrome)
end
Hi Alper,
I found that ansicon making me not able to run chromedriver on cmd (get Chromedriver.exe has stopped working)
After uninstalling ansicon and run chromedriver on cmd, I can get:
> chromedriver
Starting ChromeDriver 2.33.506120 (e3e53437346286c0bc2d2dc9aa4915ba81d9023f) on port 9515
Only local connections are allowed.
However without ansicon, I cannot run cucumber:
>cucumber features\test.feature
*** WARNING: You must use ANSICON 1.31 or higher (https://github.com/adoxa/ansicon/) to get coloured output on Windows
No such file or directory @ rb_sysopen – C:/Ruby22-x64/lib/ruby/gems/2.2.0/gems/addressable-2.5.2/data/unicode.data (Errno::ENOENT)
Is there amy workaround for running cucumber without ansicon?
I need to run on chrome as I found there is a bug in geckodriver that unable to locate element whenever there is a hidden attribute making me not workable to run firefox.
Thanks!
I don’t use ansicon at all, it’s problematic with Windows versions greater than 7.
For the problem you mentioned, it’s really hard for me to tell what’s wrong without seeing your code, but that problem has nothing to do with chromedriver or ansicon. I’d suggest deleting your gemfile.lock and doing a bundle install (if you’re using a Gemfile) if not, updating your gems with gem update.
Thanks Alper. The problem has been resolved by reinstalling the gems, now it runs on chrome. :-D