In this article, we will discover Kubernetes Objects together. Assuming you have created your Kubernetes cluster with one of the ways provided in the cluster creation article, now we can explore the Kubernetes world.
For communicating with the kube-apiserver in Kubernetes, the easiest and most secure way is to use the command line interface kubectl, which we have already installed in the previous article .
Another way of communicating with the kube-apiserver is, of course, through REST calls. You may use the command:
kubectl proxy
for making your kube-apiserver available for rest calls or you can use a programming language using the necessary client libraries: https://kubernetes.io/docs/reference/using-api/client-libraries/. You can find the API endpoints here: https://kubernetes.io/docs/reference/kubernetes-api/.
In this series, however, we will use kubectl.
Kubernetes Objects
Kubernetes objects are persistent entities in the Kubernetes system. Kubernetes uses these entities to represent the state of your cluster.
Some of the Kubernetes Objects are Pods, Namespaces, StatefulSets, Services, etc.
Creating Kubernetes Objects
There are two ways to create a Kubernetes object via kubectl: Imperative or declarative.
Let’s see both of them in action by creating a simple nginx pod.
Imperative Way
To run a single pod with nginx image which is called nginx:
kubectl run nginx --image=nginx
![]()
This will start a pod called “nginx” which uses the image “nginx” again. Let’s check if it has been created by using:
kubectl get pods

Let’s delete this pod and re-create it using the declarative way.
kubectl delete pod nginx
![]()
Declarative Way
To create the same pod in a declarative way, we need to create a YAML file. The YAML file in Kubernetes for any resource must have 3 key values: apiVersion, kind, metadata. And depending on the resource you might have a spec, data, etc.
apiVersion: Which version of the Kubernetes API you’re using to create this object
kind: What kind of object that you want to create
metadata: Data that helps uniquely identify the object, including a name string, UID, and an optional namespace
spec: What state that you desire for the object
So the YAML file ( let’s call nginx.yaml) for creating the same pod would be like this:
apiVersion: v1
kind: Pod
metadata:
  name: nginx
spec:
  containers:
  - name: nginx
    image: nginx
It uses apiVersion v1 ( which is the correct API version for creating a pod), kind is Pod, in the metadata section we define the name of the pod, namespace, labels, etc. And under spec, we define the containers inside the pod.
To create this object we will use the “apply” command:
kubectl apply -f nginx.yaml
Note the difference between “create” and “apply” commands. “create” can only be used for creating a resource from scratch while “apply” can be used to create an object from scratch and also update a change to it. The “-f” basically means file.
![]()
The same way you can delete the created resource:
kubectl delete -f nginx.yaml
![]()
As you can see, the imperative method seems to be faster and easier to use but its capabilities are limited. Check the kubectl reference docs for more usage of imperative method: https://kubernetes.io/docs/reference/generated/kubectl/kubectl-commands
The declarative way might slightly be difficult to learn and apply but it can create all the objects in Kubernetes and is a convenient way to work with Kubernetes when working on a project because this way you can trace the history of the changes and/or re-apply the new changes with ease.
Working with Kubernetes Objects
Labels And Environments
Labels are key/value pairs that are attached to objects. It can be used for just ease for categorizing objects or combining objects together.
Please note that labels are not unique. That means a label can be used for multiple objects.
Let’s create 2 Nginx pods with different labels.
kubectl run nginx1 --image=nginx -l first=pod
kubectl run nginx2 --image=nginx -l second=pod
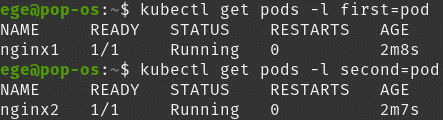
So to get the pods with labels:
kubectl get pods -l <label key=label value>
For recommended labeling check here: https://kubernetes.io/docs/concepts/overview/working-with-objects/common-labels/
Namespaces
Namespaces are intended for use in environments with many users spread across multiple teams, or projects. And for this need, Kubernetes supports multiple virtual clusters backed by the same physical cluster. These virtual clusters are called namespaces.
Basically, if we have big systems and we want them to be isolated, we need to put them in different namespaces.
Please note that this is just for learning purposes in real life having two pods in the same namespace wouldn’t be a big problem.
For checking the existing namespaces:
kubectl get namespaces
or
kubectl get ns
for short.

Let’s start by creating namespaces. To do so:
kubectl create namespace namespace1
kubectl create namespace namespace2

And deploy our nginx pods to both namespaces. We need to use “–namespace” or “-n” parameters to create those resources in the designated namespaces.
kubectl run nginx --image --namespace=namespace1
kubectl run nginx --image --namespace=namespace2

And let’s check the pods in default.
![]()
As we can see there are no resources in the default namespace. Let’s check the namespace1 and 2.

As we can see, pods are successfully deployed to the designated namespaces.
If you delete the entire namespace all resources will be automatically deleted in that namespace.
Namespaces are denoted under “metadata.namespace” in the YAML file.
A sample namespace YAML file for a namespace:
apiVersion: v1
kind: Namespace
metadata:
  name: samplenamespace
Kubernetes Series
- Episode 1: Introduction to Kubernetes
- Episode 2: How to Create a Kubernetes Cluster
- Episode 3: Kubectl
- Episode 4.1: Kubernetes Objects
- Episode 4.2: Kubernetes Workloads
- Episode 4.3: Kubernetes Services
- Episode 4.4: Kubernetes Storage
- Episode 4.5: Kubernetes Configuration Objects
- Episode 5: Scheduling in Kubernetes
- Episode 6: Kubernetes Upgrade and Deployment Strategies
- Episode 7: Kubernetes Security
- Episode 8: Deploy a Full Stack Application in Kubernetes
Thanks for reading,
Ege Aksoz

Holding a BSc in Mechatronics, Ege loves to automate. He is now working as a Software Development Engineer In Test at XebiaLabs, Amsterdam.